Archive for the ‘cuisine’ Category

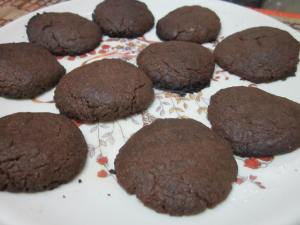
Homemade chocolate cookies- chocolaty buttery delicious!

Cookies, dip them in a cup of hot milk or simply eat them dry, crispy! The choice is yours! Chocolate cookies are one of the amazingly delicious cookies that no one can resist, can you?

IMG_1841

Preparing cookies at home is in itself a lot of fun. Are you arranging a get-together at your place with your friends and family members? Do you want to surprise them with a basket of homemade cookies? Here is a simple recipe of chocolate cookies that anyone can try at home:

Ingredients:

  • Wheat flour- 500gm
  • Crushed sugar- 250gm (as per taste)
  • Ghee- 200gm
  • Cocoa powder- 100gm
  • Milk- 1 to 2 cups (as required)

Recipe:

  • Take 500gm wheat floor in a vessel
  • Add 250gm crushed sugar and 200gm ghee in the wheat floor
  • Add 100gm cocoa powder in the floor and mix it well
  • Pour 1 to 2 cups of milk in the mixture and mix it well until it becomes dough
  • Prepare small pieces of dough in the shape of cookies
  • Take a silver foil and apply ghee on it
  • Place the foil on the tray of tandoor (oven)
  • Pre-heat the tandoor (oven) for 2 to 3 minutes
  • Place the pieces of cookies on the silver foil and keep the tray inside the tandoor for baking
  • Heat the oven for 5 minutes and switch it off
  • Let the tandoor cool down for 2 to 3 minutes
  • Remove the cookies and serve them hot in a place

IMG_1843

Note:

  • Keep an eye on the cookies while they are kept inside the tandoor for baking so that they are not over-baked
  • You can either serve the cookies hot or eat them once they cool down to room temperature

Garnishing tips:

  • Spread crushed chocolate pieces or chocolate sauce on the cookies and serve them hot
  • You may like to serve hot chocolate cookies with fresh cream
  • Sprinkling crushed pieces of dry fruits on the cookies will add to the taste

Are you crazy about cookies? Try baking them at home, the way you want! Just spare 15-20 minutes and there you go, your cheesy crunchy cookies are ready!

IMG_1844

Try hot chocolate cookies with vanilla ice-cream. It is a dream dessert, isn’t it? So what’s your recipe of chocolate cookies?

Russian Salad-Easy crunchy appetizers in your plate!

At many diner parties, barbecue parties, weddings and even socialising parties, you will definitely see starters, appetizers and drinks served before the fine dine. No matter what the occasion is, different salads and starters are always served as a side dish to the main course. Russian Salad is one of the popular side dishes, a classic appetizer that commonly accompanies the main course.

The Russian Salad was first invented in Moscow, Russia, way back in 1860 and still is a popular side dish. French born Lucien Olivier, first prepared the Russian Salad at the Hermitage Restaurant in Moscow. Earlier, different simple recipes of Russian Salads were prepared, with mayonnaise being the chief ingredient. Infact, it is a special mayonnaise stuffed salad that every foodie loves to make.

Today, people love to prepare their choice recipes. As far as Russian Salad is concerned, some add pieces of beet root and green salad leafs while many others mix it with eggs and ham.

Here is a simple recipe of crunchy Russian salad that serves 3 people, a side dish for your main course:

Ingredients 

Sr. No Ingredients Quantity Measurement
1 Macaroni 1 bowl 100g
2 Green Pees 1 bowl 100g
3 Fresh Beans 1 bowl 100g
4 Carrots 2 small 150g
5 Potato 1 small 100g 
6 Mayonnaise ½ bowl 2-3 tablespoon
7 Salt   As per taste
8 Pepper   As per taste
9 Pineapple ½ 2-3 pieces
10 Pomegranate 1 bowl 1-2 tablespoon
11 Fresh Cream ½ bowl ½ tablespoon


This slideshow requires JavaScript.

Procedure

Step 1

Slice cut 2 medium size carrots in small pieces

Step 2

Slice cut 1 medium size potato in small square pieces

Step 3

Chop French beans in thin pieces

Step 4

Mix 100g fresh green peas, sliced pieces of carrots, potato, French beans and boil the mixture for 5 minutes

Step 5

Boil 100g macaroni for 10-15 minutes

Step 6

Put the salad in a bowl and add 3 tablespoon mayonnaise sauce

Step 7

Add salt and pepper as per taste and mix well

Step 8

Refrigerate the salad bowl until it is chilled

Garnishing tips

Decorate the salad with Pomegranate seeds, slice of Pineapple and fresh cream. Serve chilled.

The red little crunchy seeds of Pomegranate and pulpy chunks of Pineapple will make your tongue twist inside the mouth. You can add different vegetables as per taste. Enjoy delicious Russian Salad with a glass of wine or simply prepare it as a side dish for your diner.

Eggtastic recipes!

I usually eat 2 eggs, a glass of milk, fruits, bread or chapatis, when I work-out full capacity. Talking about eggs, they are my favorite snack for breakfast. Sometimes, they surely deserve to be more than just a breakfast snack. They can be prepared for lunch and dinner too! Eggs, packed with proteins, are a favorite snack, easy to make and delicious in taste.

Oops, that’s not all! Don’t forget the desserts! There are so many dessert recipes, with ‘eggs’ as their major ingredients.

The variety of egg recipes, give you a chance to fulfill your hunger for breakfast, lunch or dinner.

  • Breakfast delight: In rush hours, when you don’t have much time to decorate your dish with different snacks, go ahead to cook the eggs, the way you want.  Slice them up, boil them or fry them, the choice is yours. Single-Fry, Double-Fry, Half-Boiled, Boiled, Omelet-have them with Chapatis or Bread. French Toast, another popular snack, gives you a sweetish taste.
  • Fantastic lunch: Fill your tummy with Scrambled Egg, Egg Curry, Egg Sandwich, Egg Pasta, and Egg Noodles and so on!
  • Finger licking dinner: When you have more time, think of the eggs, beyond their basics. Egg Pizza, Egg Biryani, Egg Chicken Curry, the list goes on!
  • Starters: Get ready to prepare some of the most delicious appetizers, with eggs on top. Russian Salad with Eggs, Monaco Biscuits with sliced eggs on top, Barbeques and more.
  • Egg Desserts: Cakes, Egg Pudding, Cookies and lot more!

This slideshow requires JavaScript.

The list just goes on and on! Make your own recipes out of eggs.

Athletes love to drink a glass of egg-milk, a health drink. Crack 1-2 eggs, mix them raw in 1 glass of milk and add a tint of sugar. Tell you what; this is one of the best health drinks that you can have daily, if you follow a set of heavy exercises.

For your breakfast, lunch, brunch or diner, make your own eggtastic recipes.

Joy of making Desserts-Rasgullas in Vanilla Ice-Cream!

So, you too like to eat Ice-creams? Oh, so yummy they taste! And what’s your favorite flavor? Chocolate, Mango, Vanilla, Strawberry, Blackcurrant, Pista, Litchi, the choice is yours. Or just garnish the vanilla ice-cream with topping of your choice. It is rightly said, ‘a little vanilla goes a long way.’

There are many flavors available in ice-creams. My personal favorite is vanilla. Not because it’s plain vanilla but because I can flavor it as per my taste. You can do wonders with the plain, white looking vanilla ice-cream. Sprinkle crunchy little dry fruits or just decorate your bowl of vanilla ice-cream with fresh fruits. Sauce it up with fresh juicy pulps, honey or chocolate pieces or mix a scoop in a glass of chilled coffee.

The joy of making desserts is magical. And you don’t even have to put-in any extra efforts to make this dessert, Rasgullas in Vanilla Ice-Cream.

This slideshow requires JavaScript.

Here is a simple procedure of making Rasgullas in vanilla ice-cream

Ingredients:

  • Vanilla Ice-cream- 1 kg pack
  • Rasgullas- 7 to 8 pieces
  • Dry fruits- 1 bowl

Recipe:

  • Remove the Rasgullas from the syrup and squeeze them gently
  • Pour the vanilla ice-cream in a big bowl and stir it until it melts
  • Dip-in the squeezed Rasgullas in melted vanilla ice-cream
  • Keep the mixture in fridge in a regular compartment (not in the freezer)
  • Serve chilled Rasgullas with vanilla ice-cream
  • Garnish the dessert with dry fruits of your choice

And it goes without saying, you will love it! Rasgullas when dipped in Vanilla ice-cream soak the flavored chilled milk. Vanilla adds a lovely scent to the sugary Rasgullas.

A perfect dessert to surprise your guests and friends! For a richer taste, decorate your bowl of Rasgullas in vanilla ice-cream with dry fruits, honey or cream. Suit yourself; suit your taste, for a dessert that you enjoy making!

Easy cheesy starters in your plate!

So, what’s there on the menu? How about mouthwatering appetizers before you order the meal? Usually, if you are at a hotel, you order starters before the main course. For a glass of mocktail, cocktail, a beer, wine or just a juice, you turn over the pages of the menu card and order a drink that makes your tongue dance. What about the starters? They are never ignored. Are they? Chips, groundnuts, salads, roasted papad, the choice is yours. I would call them appetizers.

And if you have invited your friends and relatives at home for a dinner party, you would still prepare atleast one or two starters. Wouldn’t you! Umm

Cooking is a drug. You can’t turn off the gas flame just after a single dish is cooked. You are always hungry for more, for some more dishes. And when you yourself cook them, it goes without saying that you like them more.

So what’s your idea of starters? Something spicy or do you like it crispy? How about preparing something simple, a cheesy delight? Cheese, yeah, we all love it as much as Jerry does in the cartoon. lol

So, cheese-cherry-pineapple on a toothpick! As simple as poking a toothpick in sliced pieces of cheese, pineapple and cherry! Sounds good? It tastes better! Irresistible indeed!

This slideshow requires JavaScript.

It’s not a recipe actually as it takes less than a minute. It is the most simple-to-make snack that, even a kid can arrange.

Ingredients:

  • Sliced cheese cubes
  • Sliced pineapple
  • Half cut Cherries
  • Toothpicks
  • Ice

Recipe:

  • Place crushed pieces of ice in a dish
  • Poke one piece each of pineapple, cheese and cherry on the toothpick
  • Prepare as many toothpicks as you want
  • Place all toothpicks in a dish filled with ice
  • Serve chilled cheese-pineapple-cherry on toothpicks

The more chilled it is, more delicious it tastes. The pieces of cheese and pineapple keep your tongue twisting with a cherry on top. And that’s not all! If you like to sweeten the taste further, dip it in honey before serving. Cheese-pineapple-cherry on toothpick is a great snack. Name it as a cocktail snack or a quick teaser to eat in between the meals. Fresh juicy pineapple and cherry when paired with cheese not only tastes yummy but also helps in digesting the proteins.

Cheese-pineapple-cherry on toothpick is just a perfect healthy and quick snack. Simple to make in rush hours, isn’t it?

Quick tangy tasty recipes of Monaco biscuits

Last week, we had a small get-together at my place. On a nice lazy Sunday, at 5.00 pm, with sun flashing mild rays of light, the air around was getting nice and breezy. I was sitting in the kitchen, chitchatting and my mom was preparing tea. A pack of Monaco, kept in the shelf, attracted my eyes. And then what, a simple recipe tempted me to decorate the biscuits. What a perfect timing it was! Bang on!

Usually you would dip them in your cup of tea or coffee and eat an entire packet of Monaco. Yeah, they are that much tasty. Monaco biscuits leave behind a salty tango taste in the mouth. Today, you get them in many flavors and with added ingredients. The simply salted ones taste the best. But Monaco biscuits aren’t just the ‘chai’ time biscuits. Naah they are more than that. Right?

Talking about simply salted Monaco biscuits, they are the party appetizers. You can make them taste the way you want. Although one full pack of round, salted, crispy Monaco biscuits fulfill your ‘chai’ time hunger, they are a perfect snack in-between the meals.

This slideshow requires JavaScript.

Flavor them, sauce them and decorate them the way you want. Here is a simple Monaco delight recipe, a snack that everyone is aware of. Enjoy them in-between the meals.

Ingredients:

  • Monaco biscuits-1 pack
  • Sliced cheese cubes
  • Tomato ketchup
  • Corn pieces
  • Green salad leaves/ lettuce
  • Pepper

Recipe:

  • Place Monaco biscuits in a plate and sauce them up with hot-n-sweet tomato ketchup (any sauce of your choice)
  • Slice-up cheese pieces on the biscuits
  • Sprinkle pepper and place small-cut green salad/ lettuce leaves on top
  • Decorate the biscuits with corn pieces and any other toppings of your choice

A tea time biscuit, Monaco, is a popular snack, a great appetizer before a meal. Talking about with what toppings to decorate the biscuits, it depends on your choice taste.

Hot-n-spicy groundnut chatni for your meal!

Like, if you are good at rice, you might just try different biryanis or pulaos. If you are good at chicken you might bake or fry different chicken dishes. Or you might simply like to stick around with your cake recipes. Why is this so? Simply because you are good at it, right? Exactly!

But cooking isn’t restricted to just one kind of recipe. Whether you’ve done it before or not, you can always try your hand to make different dishes. Rice, noodles, parathas, pizzas, curries, salads, pickles, chatnis, shakes and desserts, you can try them all. There is no harm in trying. The dish might not taste good, the first time you cook it. But the second time you will definitely mix accurate ingredients to cook a perfect taste. Finger licking perfect taste!

You just can’t say ‘no’ to cook when you yourself are a foodie. I am a foodie. I’ve tried many different recipes and enjoyed cooking them all. I like spicy food as much as desserts.

This slideshow requires JavaScript.

Parathas and chapatis taste awesome when served hot. They taste the best when served with a chatni, pickle or curd. To kick off, I tried making a chatni, a very simple yet spicy recipe.

Here is the recipe for hot-n-spicy groundnut chatni that I made:

Ingredients:

  • Grinded groundnuts-1 bowl
  • Garlic-8 to 10 petals
  • Oil-2 tablespoon
  • Rai seeds-1 tablespoon
  • Salt- 1/3 tablespoon
  • Black pepper- 1/3 tablespoon
  • Red chili powder- 1/3 tablespoon
  • Sugar- 1/4 tablespoon

Recipe:

  • Heat the oil in a small pan
  • Boil the rai seeds until they make noise
  • Fry the garlic petals in oil until they turn reddish brown
  • Pour the oil-rai seeds-garlic mixture in the bowl of grinded groundnuts
  • Add salt, black pepper, red chili powder and sugar as per taste
  • Stir well to get an equal taste
  • Serve the chatni with hot chapatis or parathas

As the chatni was ready, I ate it and …wow! The crunchy little pieces of garlic made my tongue twist. It tasted sugary spicy, mouth-watering!

Hot-n-spicy groundnut chatni, just what the parathas in your plate wanted!

Cooking -As Tasty As It Can Get

Posted: May 29, 2012 in cuisine
Tags:

Cooking -As Tasty As It Can Get

So, when did I come to know that I am a good cook? Well, during my school days, I used to roll chapatis in shapes of maps, cut vegetables and even boil the eggs for breakfast. Now, I have learnt many recipes. Yeah, I do cook at home often and have tried many recipes so far. Being a foodie helps me try different recipes.

It was a year ago, when our office had planned a cooking day. I was the first employee to get excited when the HR announced about ‘Cooking Day’ being planned in office. We all had to form groups and cook for the entire office. This was the first time that I tried my hand at Veg Pulao, for as many as 25 people. Yeah, right, I did cook for 25 people, and tell you what, it tasted awesome. Finger licking good!

This slideshow requires JavaScript.

On the Boxing Day, the ‘Cooking Day’ I came to office all bags packed with required ingredients. The gas cylinder and utensils was already set-up in the lunch room with other basic requirements.

Here is the recipe of Veg Pulao that I cooked

Ingredients:

  • Rice-2kg
  • Onion-1kg
  • Paneer-500g
  • Carrot-500g
  • Pineapple-250g
  • Mava/khava-250g
  • Green peas-250g
  • Butter-250g
  • Cauliflower-250g
  • Fresh green chilies 2
  • Salt (as per taste)
  • Pepper (as per taste)

Recipe:

  • Heat some butter in a hot pan and fry the green chilies until they turn brown.
  • As the butter melts, fry the onions, carrots, green peas, cauliflower and paneer until they turn golden-yellow.
  • Add salt and pepper in the mixture and set it aside.
  • Cook the rice in a normal utensil, not in a cooker. Add some salt as per taste in the rice as well.
  • Mix the cooked rice in the above mixture and stir well on a low flame.
  • Sprinkle the mava and pineapple chunks equally in the rice at the end.
  • Serve hot Veg Pulao with a cherry on top.

For me, icing on the cake was, the rice recipe turned out to be very tasty. I enjoy cooking and enjoyed it this time more.

Cooking is exciting, yes it is! No matter how good or bad you are at it, you can at least give a try. When you see seeds of green chilly pop-up in the hot pan, or fresh green peas swim in the butter, you will have water in your mouth. Wont you? When the butter melts on those juicy paneer pieces and when the mava/khava sweetens the slices of carrots for a yummy taste, you feel like being the first one to taste them.

Anyone can cook and when it comes to the recipe, choice is yours. At times, you get tempted to try your hand to cook your favorite recipe! Don’t you?

The message was beautifully passed in the Hollywood film Ratatouille, ‘Anyone can cook!’ So did me!